Translation
Translate items
Translation with ExamDeveloper Item Assist enables efficient localization of exam questions while maintaining content integrity across different languages. Once translated, items can be integrated directly into a project's review workflow to ensure content quality and accuracy.
The translation process is initiated on the Search page. Learn more about using search here.
|
|
Translate items
- Go to the Search page.
- Make sure you are viewing a Project view, not an Item Bank view. (Translation is only available from Project views.)
- Search for items by content or comment, Item ID, exhibit ID, or translation group ID.
- Select the checkbox next to the items you want to translate.
 All items must be written in the same source language.
- Items cannot be in a Draft, Imported, or Obsolete status.
- items must be editable in the current project.
- Click Translate in the search results toolbar.
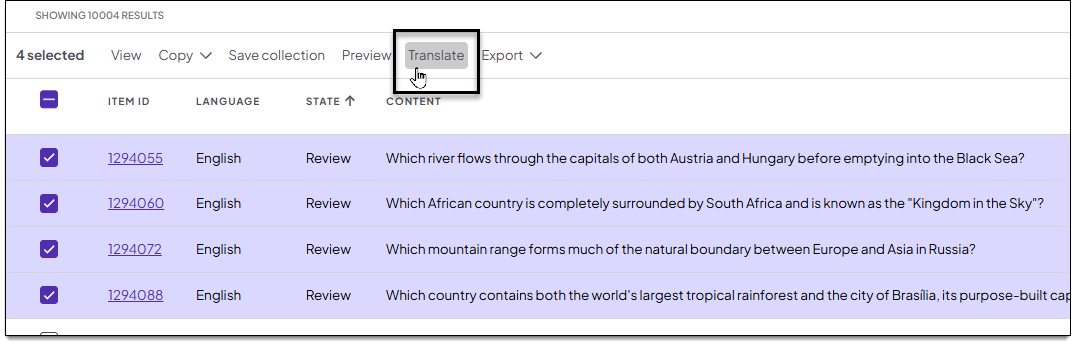
- This option is only available for a project when the item bank has more than one language enabled and AI-assisted item translation is turned on in the Language configuration settings.
- In the translation side panel, specify the following:
- Translated item review state: Select which review state should be applied to the newly translated items. (This list shows all review states currently enabled for the project.)
- Language: Select one or more languages or click Select all to select all available languages. All items you selected in step 4 above will be translated into the languages you select here. (The Language list shows all languages that are currently configured for the item bank.)
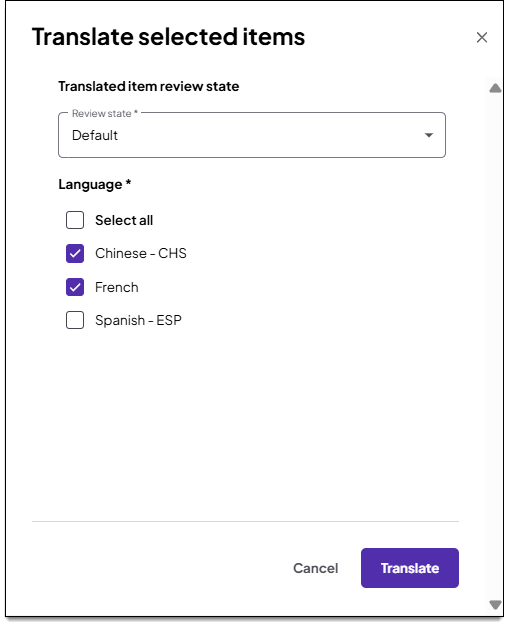
- If any of the selected items cannot be translated, a notification is shown at the top of the panel.
- Click Translate.
- If a word or phrase exactly matches a term in the translation glossary, that word or phrase is ignored and the predefined glossary term or phrase is used instead.
- Translation begins and you are taken to the Queue page. The status of the translation will be shown as "Processing". Once the status is "Complete", a report (.xlsx file) will be available for download.
- You can leave the queue and return to it later.
 Files are only available for 24 hours from the time they are generated.
- You can leave the queue and return to it later.
- When the report is ready, click Download.
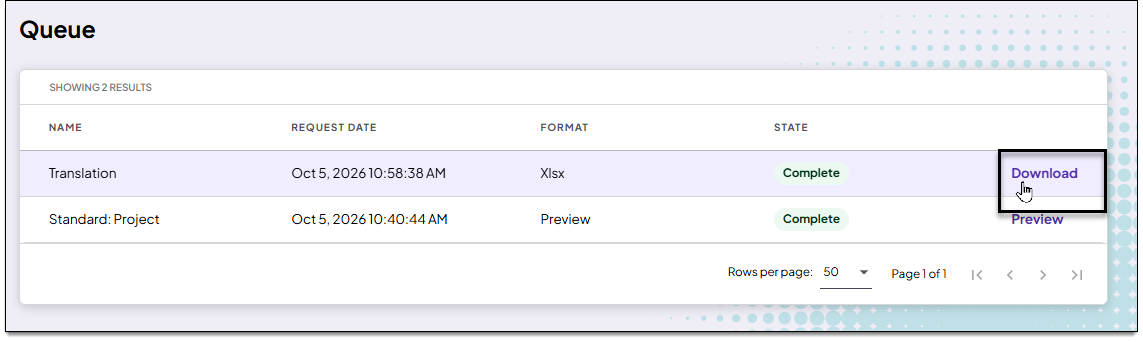
- Find and open the file in your local Downloads folder.
- The report has two tabs/worksheets:
- Translated successfully: Lists items that were successfully translated alongside the translated item IDs. Fields included on this tab:
- Item ID: Question number of the source item (the item that was requested to be translated)
- Source language: Language of the source item
- Translated language: Language of the translated item (the language selected in the translation request)
- Translated item ID: Question number of the translated item
- Translation errors: Lists source items that were not translated due to errors ↓. Fields included on this tab:
- Item ID: Question number of the source item (the item that was requested to be translated)
- Language: Language of the source item
- State: State of the source item
- Issue description: Description of the issue; see common errors ↓
- Translated successfully: Lists items that were successfully translated alongside the translated item IDs. Fields included on this tab:
- You can now review the translated items ↓.
 If a translated question is part of a case, a new translated version of that case will be created for that language. (If only exhibits from a case are translated, a new translation of the case is not created.) If a translation for the case already exists for that language, the translated items are added to the existing translated case. If some items from the case are not translated, a warning message will show in the Case panel the next time the case is viewed or edited.
Common translation errors
- Source item is in Draft, Imported, or Obsolete state
- Items in a Draft, Imported, or Obsolete state cannot be translated.
- Source item is not editable on the current project
- Items must be editable on the current project to be translated.
- Selected source item is in one of the selected target languages
- The source Item is authored in the same language as the selected target language.
- Source item is already translated to the selected target language
- A translation for this item already exists in the selected target language.
Review the translated items
- From the translation report, copy the item IDs you want to review.
- Go to the Search page.
- Make sure you are viewing a Project view, not an Item Bank view. (Translation is only available from Project views.)
- Paste the item IDs you copied into an item ID search on the Search page.
- Or, search all translations for a source item by pasting the source item ID into a translation group ID search.
- Select the checkbox next to the items you want to review.
- Click Viewin the search results toolbar.
Re-translate items with a modified source
If a source item is modified (e.g., the stem or response options were changed), existing translations need to be updated accordingly. This can be done manually or using the AI-assisted "re-translate" option.
- When viewing a translated item whose source item has changed, a warning message is displayed at the top of the page.
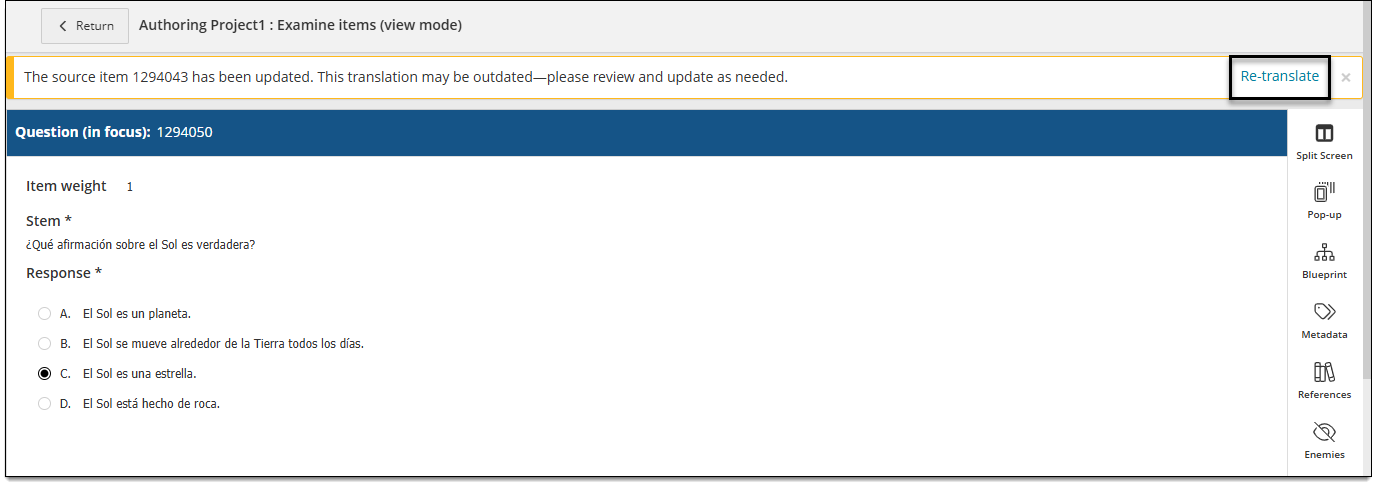
- To use the AI-assisted translation, click Re-translate in the warning message.
- This option is only available for a project when the item bank has more than one language enabled and AI-assisted item translation is turned on in the Language configuration settings.
- A modal displays the current translation alongside the proposed re-translation.
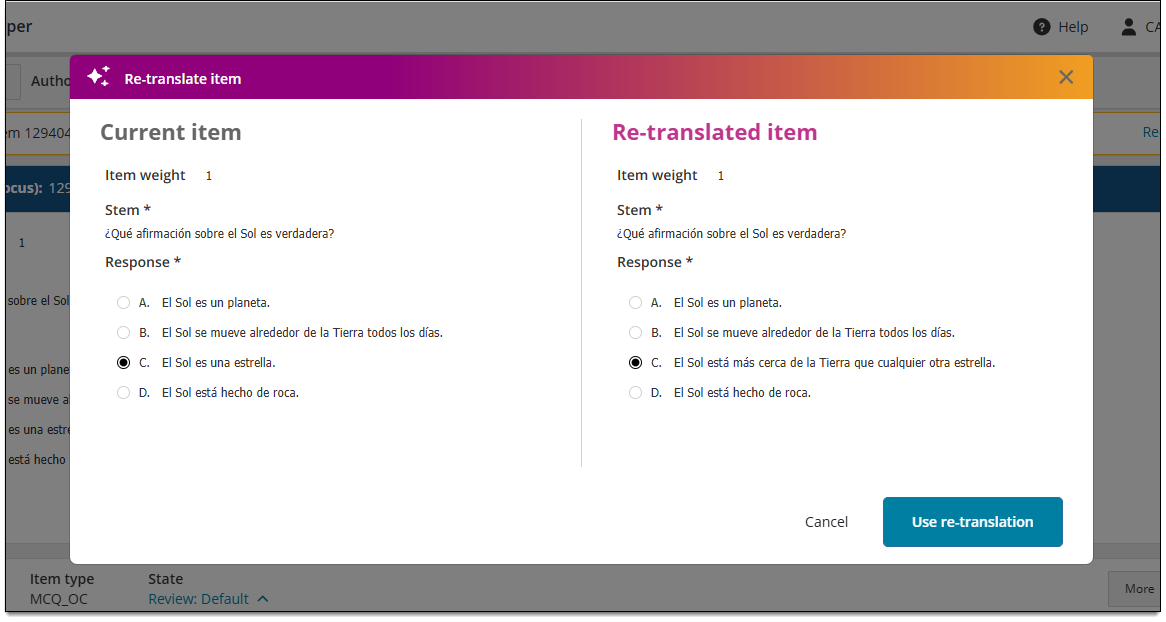
- If you are satisfied with the re-translation, click Use re-translation. (If you are not satisfied, click Cancel.)
- If the re-translation was used, the content is updated in the item editor. You can make further edits manually if needed.
- Click Save.
Pearson Proprietary and Confidential